概要
自分用に作成したLimeLibraryを用いたUIの実装例についての続きになります。
前回はこちら。
limegame.hatenablog.com
このライブラリでどのようなことができるかについてはこちらの記事をご覧ください。
limegame.hatenablog.com
今回の内容
アイテムの一覧表示の実装を行います。
実装手順
アイテムリスト画面の中身を実装
まずはItemListViewにアイテム一覧を表示する機能を追加します。
ライブラリの使い方とは少し外れるので詳細な手順については割愛しますが、以下のようなコードを追加しています。
// ItemData.cs
namespace Sample
{
    public class ItemData
    {
        public string Name { get;  }

        public ItemData(string name)
        {
            Name = name;
        }
    }
}
アイテムリスト用のデータクラスです。
現状はアイテム名のみ定義されています。
// ItemUiElements.cs
using LimeLibrary.UI;
using LimeLibrary.UI.Parts;
using LimeLibrary.UI.View;
using UnityEngine;

namespace Sample
{
    public class ItemUiElements : MonoBehaviour, IInstantiatableUiElements<ItemUiElements>
    {
        [SerializeField]
        private UIText _text;

        public ItemUiElements Self => this;

        public void Initialize(IUIView parentView)
        {
            _text.Initialize(parentView);
        }

        public void SetItemName(string itemName)
        {
            _text.SetText(itemName);
        }

        public void Destroy()
        {
            Destroy(gameObject);
        }
    }
}
1アイテム欄のUIを表すクラスです。
名前テキストを変更する機能を持ち、コンポーネントとしてアタッチして使用します。
また、IInstantiatableUiElementsというLimeLibrary内のインターフェースを実装することで動的なInstatiateを楽にしています(後述)。
// ItemListUiElements.cs
using System.Collections.Generic;
using LimeLibrary.UI;
using LimeLibrary.UI.View;
using UnityEngine;

namespace Sample
{
    public class ItemListUiElements : MonoBehaviour
    {
        [SerializeField]
        private ItemUiElements _originalItemUiElements;

        private readonly List<ItemUiElements> _createdItemUiElementsList = new();

        public void Initialize()
        {
            // コピー元のGameObjectはオフにしておく
            _originalItemUiElements.gameObject.SetActive(false);
        }

        public void CreateList(IUIView parentView, IReadOnlyList<ItemData> itemDataList)
        {
            // リストを作る前に前回生成したリストを削除
            Clear();

            if (itemDataList == null) return;

            // リスト分生成しデータを流し込む
            foreach (var itemData in itemDataList)
            {
                var itemUiElements = _originalItemUiElements.Instantiate(parentView);
                itemUiElements.SetItemName(itemData.Name);
                _createdItemUiElementsList.Add(itemUiElements);
            }
        }

        public void Clear()
        {
            // 作成したアイテムを全て削除
            foreach (var itemUiElements in _createdItemUiElementsList)
            {
                itemUiElements.Destroy();
            }
            _createdItemUiElementsList.Clear();
        }
    }
}
アイテムリスト全体のUIを表すクラスです。
元となるItemUiElementsを参照として持ち、リスト全体の生成とクリアの機能を持ちます。
先ほどのIInstantiatableUiElementsを実装することで _originalItemUiElements.Instantiate と呼ぶだけで、親の指定、GameObjectのアクティブ、Initialize関数の呼び出しまで行ってくれます。
// ItemListView.cs
using System.Collections.Generic;
using System.Threading;
using Cysharp.Threading.Tasks;
using LimeLibrary.UI.View;
using UnityEngine;

namespace Sample
{
    public class ItemListView : UIView
    {
        [SerializeField]
        private ItemListUiElements _uiElements;

        protected override async UniTask OnInitialize(CancellationToken cancellationToken)
        {
            _uiElements.Initialize();
        }

        public void CreateList(IReadOnlyList<ItemData> itemDataList)
        {
           _uiElements.CreateList(this, itemDataList);
        }
    }
}
前回までで作成済みのItemListViewにItemListUiElementsのSerializeFieldを追加し、リスト作成機能を持たせます。
また、ItemListUiElementsはItemListViewと同じGameObjectにアタッチしています。
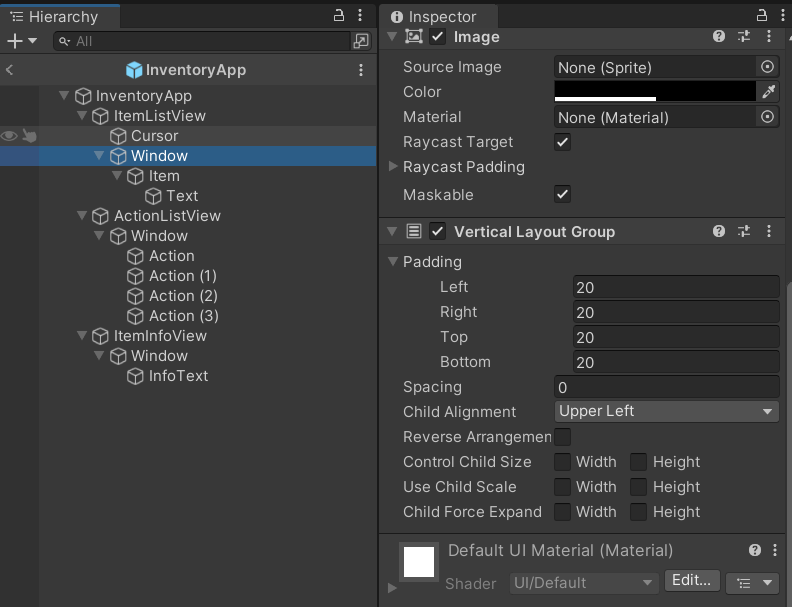
LayoutGroupの設定
ItemUiElementsをアタッチしているGameObjectの親のGameObject(以下の場合はWindow)に、子がInstantiateされたときに自動で並ぶようにさせるため、VerticalLayoutGroupをアタッチします。
ItemDataの受け渡し
フローからリスト作成を呼び出したいため、アイテムデータリストをフローのコンテキストに追加し、受け渡せるようにします。
// InventoryFlowContext.cs
using System.Collections.Generic;
using LimeLibrary.UI;

namespace Sample
{
    public class InventoryFlowContext : UIAppFlowContext
    {
        public IEnumerable<ItemData> ItemDataList { get; private set; }

        public void SetItemDataList(IReadOnlyList<ItemData> itemDataList)
        {
            ItemDataList = itemDataList;
        }
    }
}
InventoryFlowContextは前回のフロー実装で作成済みで、外部から受け渡したいデータ、ステート間でやりとりしたいデータを格納するためのクラスです。
InventoryAppにもアイテムデータリストを渡す関数を追加し、先ほど作成したコンテキストへ渡す関数を呼び出します。
// InventoryApp.cs
using System.Collections.Generic;
using LimeLibrary.UI.App;
using UniRx;

namespace Sample
{
    public class InventoryApp : UIApp
    {
        private InventoryFlow _flow;

        protected override void InitializeApp()
        {
            _flow = new InventoryFlow(this);

            EventObservables.GetObservable(UIAppEventType.ShowStart).Subscribe(_ =>
            {
                _flow.Start();
            }).AddTo(this);
        }

        public void SetItemDataList(IReadOnlyList<ItemData> itemDataList)
        {
            _flow.Context.SetItemDataList(itemDataList);
        }
    }
}
最後に、呼び出し側からInventoryApp.SetItemDataListを呼び出すように変更します。
InventoryAppのShowが呼ばれる前にデータをセットする必要があるため、CreateAppAsyncでisShowオプションをfalseにし、SetItemDataListを呼んだ後に手動でInventoryApp.Showを呼び出しています。
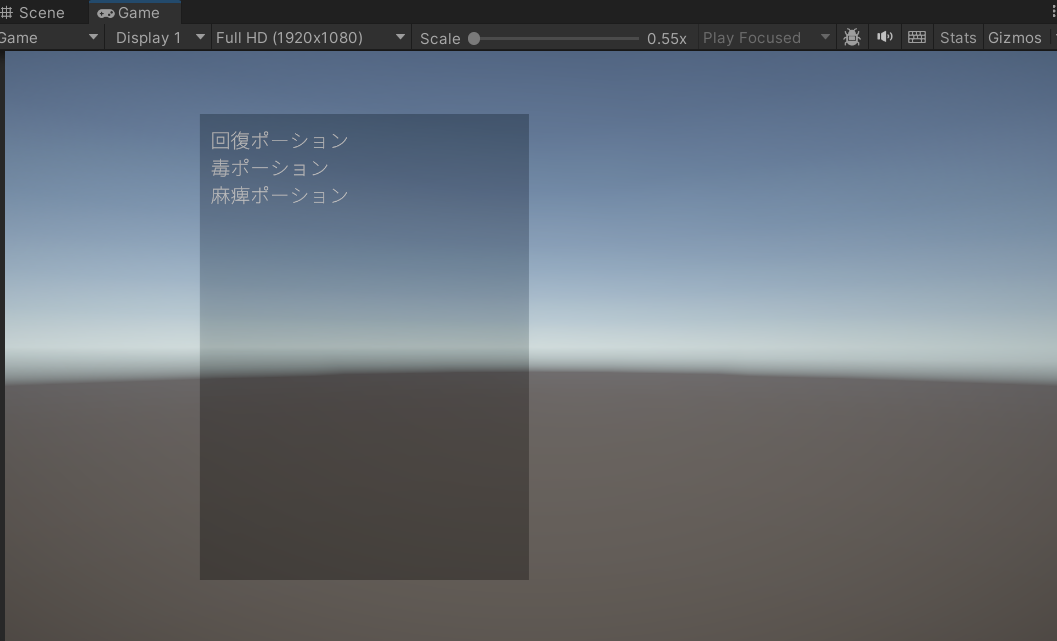
// Sample.cs
using System.Collections.Generic;
using Cysharp.Threading.Tasks;
using LimeLibrary.UI;
using UnityEngine;

namespace Sample
{
    public class Sample : MonoBehaviour
    {
        private UniTask _createAppTask;

        private readonly List<ItemData> _itemDataList = new();

        private void Awake()
        {
            _itemDataList.Add(new ItemData("回復ポーション"));
            _itemDataList.Add(new ItemData("毒ポーション"));
            _itemDataList.Add(new ItemData("麻痺ポーション"));
        }

        private void Update()
        {
            if (Input.GetKey("z") &&
                _createAppTask.Status == UniTaskStatus.Succeeded &&
                !UIManager.Instance.UIAppManager.ExistsUIApp<InventoryApp>())
            {
                _createAppTask = CreateInventoryApp();
            }
        }

        private async UniTask<InventoryApp> CreateInventoryApp()
        {
            var inventoryApp = await UIManager.Instance.UIAppManager.CreateAppAsync<InventoryApp>(
                "Assets/Prefabs/InventoryApp.prefab",
                UIAppAwakeType.Stack, gameObject.GetCancellationTokenOnDestroy(), isShow: false);

            inventoryApp.SetItemDataList(_itemDataList);

            await inventoryApp.Show(gameObject.GetCancellationTokenOnDestroy());

            return inventoryApp;
        }
    }
}
呼び出し側で設定したアイテムデータが表示されれば成功です。
次回
作成中…